Le Canard – Vins et Fromages

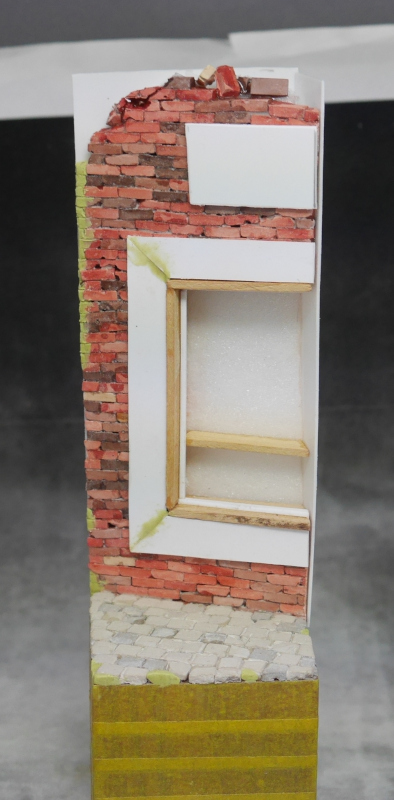
The WWI chap’s base is finally nearing completion. I finally buckled down and added the last bits of detail – some fallen bricks and the extra bits around the window – cracked out my crappy airbrush to put some colour and light down quickly, and then set to finishing up most of the painting.

I still need to finish off with some pigments and fill in the hole where I used to have the soldier standing (he was just a little too close to the window, and the shopfront was blocking the view to his a back more than I’d like), and then add the glass and some external framing, but otherwise he’s pretty much good to go. He’ll definitely be ready for Euro in a few weeks.

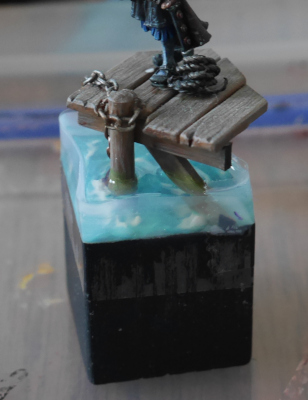
So, with him out of the way, I’ll be able to focus on Project Ducks. To this end, I had a go with the two-part water effect, and the results are much more pleasing. I also used acetate, super glue and PVA for the dam, and they worked fantastically. Really sharp edges, clear surfaces and no leakage whatsoever. I also put a little paint down to see if it would leach into the water and it didn’t, which bodes well. I’ll probably still gloss the areas that get water effects, of course.

On the downside, however, the two-part resin does shrink quite a lot, which results in quite a rim to fill in. I thought I’d see how the Vallejo water worked for that (it’s obviously simpler to work with) and it was pretty terrible – as you may be able to see, it ended up with some weird sort of crackling and the layers are really visible. It also shrank a lot and, if it had worked, would have needed a few more layers to level it out.

Anyway, I think I’ve now figured out the best ways of doing it, so hopefully I won’t cock up and ruin the mandarin duck when it happens…

A victory over mediocrity

The competition is over, and Martin is defeated. While he leapt ahead initially, he once again struggled to even limp towards the finishing line. For shame, Martin – for shame. As you might have guessed, my cursed pirate is complete:

I was especially pleased with the feather for some reason. I suspect it’s one of those things where the sculpt really helps you out. I also opted for NMM on the belt buckle. This was partially because I hadn’t done any in quite a long time, and partially because the undercoat looked almost like that even before I’d put any proper paint on it, and it worked alongside the rest of the model.

So, he’ll be travelling to Euro in a few weeks and then off to SMC in October. Following that, however, there will only be ducks. To that end, I’ve started making a base for the mandarin:

P1040884

The stones are just balls of milliput and the plant is from Green Line – they make a fairly large range of laser-etched paper plants with some metal parts (the bulrushes, in this case), and while they looked dubiously simplistic in the packaging, they really do some out very nicely. I have a bunch of other plants that I’ll be cracking out for the other ducks.

I’ve also been playing around with water effects for the obvious reason that ducks love water, and I have plans for a few of them to be on or in the water. So, I looked up advice online and was reminded that almost every article explains the process in some detail before stating “but it all went wrong so I ripped it off and tried again”. I’m not good with that sort of trauma, so I’ve sensibly been experimenting on things that don’t really matter.

Anyway, there are basically two types of water effect: one-part water, which is usually good for creeks and other very shallow types of water, and two-part water, which is much better for the sort of things I’m planning. I thought I’d give the one-part water a try, however, if only because there was some available at the local hobby shop. For reference, this is the Vallejo “Water Texture”.

There is an additional critical factor when using water effects: how you dam off the edges of the base. I’ve seen a couple of methods of this, one of which was beautifully lazy, so I thought I’d give that a go first – using tape. Full disclosure: tape isn’t very good for this, as you’ll see:

P1040876

It should be quite obvious that the edge is neither sharp on the corners nor straight along the sides. For really shallow water, I suppose, it might be a reasonably effective method. I don’t recommend it for anything with much depth. The next experiment will use acetate and glue to aim for super-sharp, perfectly straight edges.

Some observations of the one-part water that might also be useful:

  1. It dries to a rubbery consistency, which I assume makes it fairly durable – it also makes it basically impossible to sand, so those uneven sides will be with you forever.
  2. The instructions say not to pour more than 3mm deep, but also that you can use layers for greater depth. The example uses two layers and they’re basically invisible. That’s a good thing from my perspective, so it’s nice to know that this is possible.
  3. The water didn’t lift paint off the model. I’ve heard that this can be a problem, but it didn’t happen here. That could be because of the water effect or it could be the paints I previously used, so don’t take this as gospel.

Next week, I’ll give the two-part water a go – I’m just waiting on a delivery of oral syringes to measure the components… and possibly a visit from the authorities because of some of the Google searches I had to do to figure out what they’re called.

A great piratical rumbustification

Once again I begin by assuring you that the WWI piece has not been forgotten. By way of proof, I offer the nearly completed build of the base – the plasticard is in place on the back and side, and I’ve tidied up the rough edge with some extra bricks in milliput. It turns out my wall was slightly wonky, so I had to fill that out a touch. Note to self for the future: build more wall than you need.

P1040867

Up next will be adding a little extra around the window itself and some rubble on top, and then it’ll be ready for painting.

On the side, however, I’ve made a fair bit of progress on the cursed pirate. It turns out that the crackle paint basically disappeared under the undercoat and a couple of layers of paint, so that’s a lesson for you: if you want the crackle to be visible after you paint it, you need to use quite a thick layer. Still, the overall image is working pretty well:

I’m really pleased with how his face has come out, and while the torso is pretty rough, I think it works. I was also happy with the freehand – along with the purple-black cracks, the tattoos have come out quite nicely. I didn’t bother taking a shot from behind because the unpainted hat dominates, but he has the edge of a treasure map tattooed on back there.

My buddy Martin has been painting the same bust (I bought him a copy at the same time so we could compare our takes), and he’s actually looking like he’ll finish it before me. This would be a truly remarkable achievement: Martin typically paints one model per year, so I normally finish four or five (or ten) before he finishes one. Ladies and gentlemen, place your bets.

One last fantasy piece

Despite appearances, the WWI chap is progressing. I’m not a big fan of all that smoothing off you do with larger bases, so it’s been slow going, but I did get one side sorted out today, and the other should be done tomorrow, assuming I don’t suddenly come up against something disastrous. I’ll also need to add a little more detail to the window frame, but that’s nothing in the larger scheme of things.

In the meantime, I’ve continued working on the ducks, and now Lenin and the mandarin are both finished, and I have a few more underway. I need to remember to order more ducks.

I’m fairly happy with how they’ve come out. It’s easy to be critical of your own work, especially when they’re blown up to this size, but I just remind myself that they’re minuscule, and they do look great in the hand.

These guys are all for next year’s shows, though, and I have time for one more fantasy piece before I get properly stuck into painting nothing but ducks.

As some of you might have seen, the very, very famous Madagascar Pirate (often misnamed the Sad Pirate, because of a particularly famous version of the piece) is back on the market. Raul Latorre has dug out the moulds and has re-released it along with a few other pieces and some newer works.

Check out his range: it’s quite special.

If you do buy him, the casting is lovely, although his earrings didn’t manage to cast. That’s an easy fix if you’re keen on them, of course, so don’t let that stop you.

Anyway, I’d been thinking about doing him for years, but had resigned myself to the fact that it would be another one of those pieces that you dream about but never get the opportunity to do – like Ilyad’s Virago. Of course, I like to mildly horrify people, and I also like to do things people haven’t done before, so I thought I’d do him for fantasy. Pirates are already sort of halfway there, much like gladiators.

So, here’s where I am with him:

P1040768

As you can see, I’ve gouged out his chest and added some strange brown stuff all over the place. This brown stuff is one of GW’s crackle paints. Dried earth sort of thing. I have an image in my mind of a creeping blackness taking over the corpse, and I’ll use the crackle for that.

Of course, crackle paints are notoriously fickle, and I wanted to be sure that I’d get the right effect from it. This is the second attempt, and I decided I needed to take it more seriously after the first (which basically looked like I’d just put too much paint on). So, I went to my trusty plasticard for a wee test of some theories.

P1040773

The two areas on the left are both neat – no watering down or anything – while the two on the right have been very slightly thinned. The bottom row has also been painted over a thin layer of dried PVA glue. My thinking with this was that the crackling would work better on a more flexible surface – if the paint keys to the resin, after all, it’ll have a harder time actually moving apart as it dries.

As you can see, it looks like this is a good plan: there’s much more crackling. On the down side, there are fewer large, unbroken areas, and it’s much more regular. If you’re after actual cracked earth, you’re probably fine using the stuff straight out of the bottle (and I’ve done so myself – it’s a genuinely good product at a good price from GW, which feels like a strange thing to say).

Figureworld 2018

Another year, another Figureworld, and once again it was nice quick show to catch up with people, enjoy Oundle (which really is very pretty) and go shopping for plinths.

I don’t tend to order my plinths online, not least because I like to see the actual woodgrain, but also because I buy a lot of them prospectively – for pieces that I don’t know about yet. From that perspective, I find it’s nice to get a mix of narrower plinths that will force me to constrain the scene, broader ones for larger pieces or small scenes, a few angled plinths for busts, and so on.

Anyway, I doubt anyone cares all that much about my shopping habits, and you’re just here for the pretty pictures. The lighting in the hall was a little rough, it must be said, so half the models had the sun streaming in a window behind them, which made it difficult to get decent shots. Equally, the ones facing into the sun are a little washed out. If I was a serious photographer, I’d probably figure out some way to fix this. If anyone knows an easy fix (either on the camera or after the fact), I’d be keen to hear.

Anyway, the goodies: