This week, as you might notice from the title, I’ve finally started playing around with a wet palette. For some reason, I’ve just never seen the need before – my trusty ceramic tile seemed to work fine, and I don’t usually need to preserve a colour mix, so wet palettes seemed pretty redundant.
It was after listening to Mike Blank’s talk at Euro and chatting to Martin that it occurred to me that there’s a little more to a wet palette than I’d really been considering. It’s not that Mike Blank even uses one – he uses strips of masking tape stuck to a block of wood. This, understandably, confused the hell out of everyone present, because it goes against pretty much all of the standard practices, but you can’t argue with the results.
Martin and I were discussing this in the car on the way back home, and the fact that Mike had said that he got a matte finish from paints this way, and it occurred to us that the masking tape was presumably absorbing some of the medium in the paint, which will naturally make the finish flatter. Martin mentioned seeing a similar effect from using a wet palette, so I thought I should finally give it a go. This was solidified in my mind watching Roman Gruba do a demonstration at SMC. Actually seeing a master in action with one is pretty cool.
I could have made one pretty easily (a plastic takeaway tray, jiffy cloth and baking paper will do the trick), but I thought I might as well buy something, if only so it’s easier to transport. I do most of my painting at Inner Sanctum Collectibles in Cambridge, so I need to be able to pack up my stuff and lug it around via public transport.
In the end, I got a Sta-Wet Palette, which more than does the trick. It comes with some paper, but that looks like a pain to prep (you’re meant to soak it for 15 minutes in hot water), so I just cut some baking paper to use. For those who haven’t used a wet palette before, it’s important to note that you need to use siliconised paper, not waxed paper. Waxed paper won’t let moisture pass through particularly well, and the wax could transfer into the paint when you work it, which, I imagine, won’t help.
Anyway, the wet palette is Fun. You sort of poke the paint around until it’s the consistency you want, which is a whole lot easier than trying to get the mix right on a standard plastic or ceramic palette. You can also try out colour blends on the palette really easily because the paint stays wet (literally wet blending).
With that shameless advertising out of the way, here’s the soldier’s progress:


As you can see, I’ve refined the volume on his cheek quite a bit, so the shape doesn’t get lost in fairly bland shading anymore (with last week’s work for comparison):
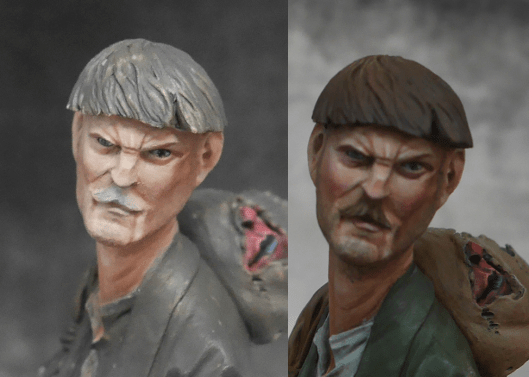 The colours are a little misleading – I haven’t actually changed the skintones all that much, they’re just being picked up more accurately by the camera now that some other colours are in place, and I used a lighter part of the backdrop.
The colour choices were made for me by referring to Russian uniforms from the early 19th century. He’s meant to have been a soldier returning home from war, and I couldn’t think of a set of colours that would do a better job of telling that part of the story (not that it’s necessarily obvious without my mentioning it – I’ll need to add some extra details to sell that).
More generally, I’ve been working on getting a shine on his hair, but that’s not really visible from any of the photos. I’ll need to work that up a bit and spread it perhaps a bit further around so it’s more obvious. Otherwise, he’s pretty much there.
I also bought a daylight lamp this week, so I may be able to finally get some painting in outside of the weekends.
